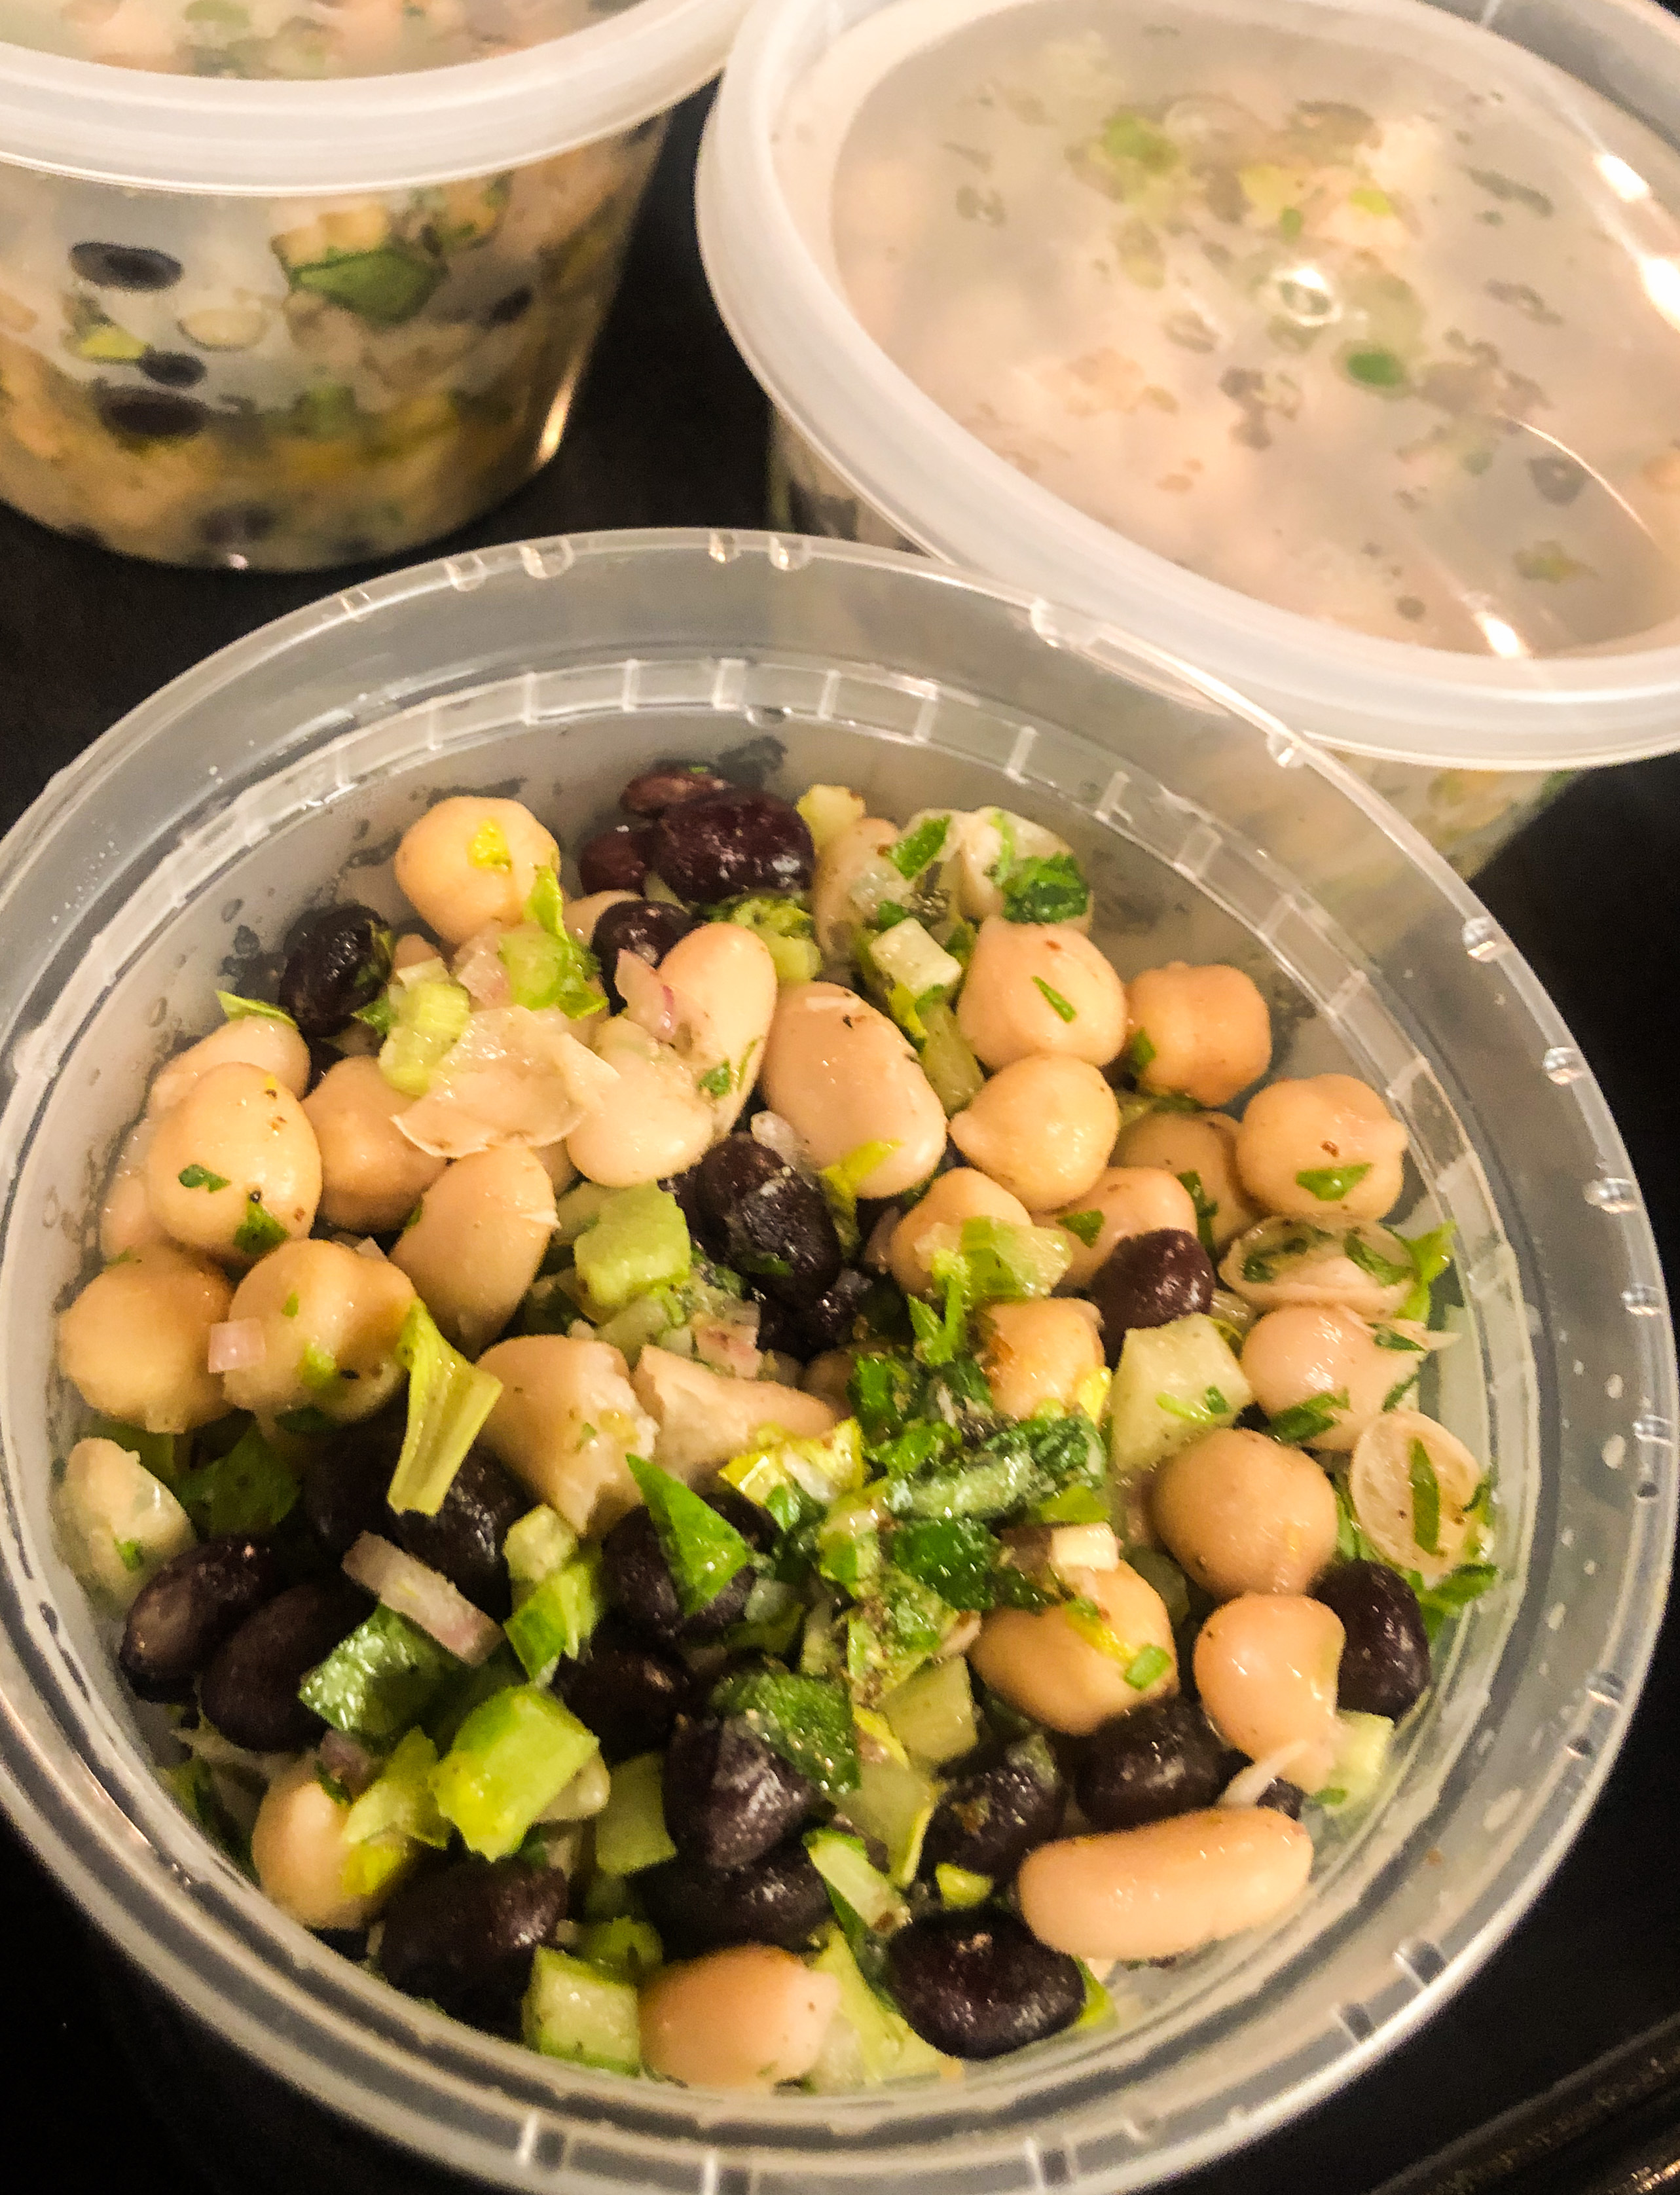
This Three Bean Salad is exactly what I need after a long day at work. No fuss. No cooking. But super tasty and super filling, and I feel so much better knowing I’m feeding myself some good, clean food! I try to keep some fresh ingredients on hand all the time, such as parsley, lemons, celery, but I didn’t have all the fresh ingredients I needed, so I just used dried herbs I still had in my pantry. (I had to dig around but I found them!) (Fresh herbs are definitely NOT essential during times like this, so skip the grocery store and make the best of what you have!)
The beans I used happen to be some that I always have in my pantry, but you can substitute with whatever beans you have. Same with the herbs, I happen to have Za’atar (because I love this spice blend) but any blends can be used, such as Jamaican spice, Southwestern spice, whatever your tastebuds desire.
Although this is a main dish to ME, it can definitely be a great side to any amazing protein you bake, grill or fry. Enjoy!
1 (15 oz) can cannellini beans (white kidneys beans)
1 (15 oz) can chickpeas (garbanzo beans)
1 (15 oz) black beans
1 clove garlic
2 tsp honey
1 Tbsp Dijon mustard
1 Tbsp white wine vinegar
1/4 cup extra virgin olive oil
1-2 tsp za’atar
Kosher salt (good pinch or two) and freshly ground pepper
Juice of 1 large lemon
1 Tbsp dried mint (3 Tbsp fresh, chopped)
1 Tbsp dried tarragon (3 Tbsp fresh, chopped)
3 Tbsp fresh parsley leaves, chopped
4 stalks celery, finely diced (including leaves)
1/2 red onion or 1 large shallot, finely diced
Instructions
1
Drain and rinse all the beans, let dry as much as possible
2
In large bowl, grate the garlic then whisk in the honey, Dijon, vinagar, olive oil, zaatar, salt and pepper, lemon juice, dried herbs and 1 Tbsp of the fresh Parsley. Add the celery, onion and beans and toss well. Add the rest of the parsley and toss. Add more salt and pepper (or za’atar!Serve immediately or store in airtight container for 2-3 day.
Notes
*For the herbs, if you have fresh mint and tarragon, do the same as I described with parsley - chop 3 Tbsp each, add 1 Tbsp to base, then toss the rest in at the end after the beans have been added.
I think this is probably the easiest pizza sauce I have ever made. And one of the tastiest! Now, ideally, I’d love to have fresh basil and oregano to use, and yes, I have made the kind that takes some long cooking times, which was always very tasty! Unfortunately, staying “safer at home” in these unsure times really does mean that. So, I do. Everything I used I found right in my pantry and herb cabinet. I just used dried herbs and added some balsamic vinegar to balance out the flavors and give it a great depth of flavor. You can also add a pinch or two of red pepper flakes for a little heat if you like. Best part is, there is NO COOKING involved! You can use it immediately for your pizza or pop it in the freezer for later use. Either way the taste is wonderful and perfect.
This recipe makes quite a bit sauce so I’ve found that I can freeze this into perfect serving portions and take out whenever needed. Just ladle it into a muffin tin and place in freezer for about 30 min (or until solid). Then place into large freezer bag for storing up to 3 months. (This is my own perfect portion for my pizzas, you make your serving size to your liking!) Use it for pizza, bread sticks (Recipe can be found on this site), or serve over meatball sandwiches, ravioli, or for whatever your heart desires. Enjoy!
1 tsp dried herbs, such as Italian Blend or Herbs de Provence
1 tsp dried or ground oregano
Instructions
1
Place whole garlic cloves into a food processor (or blender) and chop to fine bits.
2
Add all the other ingredients and purée to desired consistency. Taste and add more salt, pepper or balsamic vinegar as needed. Use immediately or freeze for later.
3
To freeze, ladle into muffin tin. Place tin in freezer for about 30 minutes or until frozen
4
Use sharp knife to release each portion from tin. Place in freezer bag and label.
Notes
Any canned whole or crushed tomato will work, but I do have to say that I like using San Marzano tomatoes whenever possible. Their flavor is just another level up, but they can be hard to come by in my rural little town so I use regular ones as well, which is just fine!
I learned how to make this quick and easy pizza dough watching Bobby Flay some time ago. I love how easy and quick it is. PLUS, I just recently learned that I can freeze it! (For up to 3 months!) Yay! So with all that is going on right now…shortage of basic supplies, more home time with always-hungry kids and unpredictable work hours at the clinic, I decided to go ahead and make several batches to be ready any time we need a quick meal. One batch will make two (14-inch) pizza pies. You can, of course, quarter each half into individually sized pizzas. If you decide to freeze, just be sure to let it thaw in fridge over night, then let sit out at room temperature for 30 minutes prior to shaping into your desired shape (round or rectangle).
Once shaped I like to brush it with olive oil and sprinkle with some California Garlic Salt. Bake the crust for about 5-7 min before adding toppings to make it a bit sturdier (in my opinion), it should be light and golden, not browned yet. Finish it in the oven until crust is golden brown and cheese is gooey, bubbly and toppings are cooked to your taste. For even more added flavor I melt butter with garlic powder and brush the edges at it comes out of the oven. Also, instead of flour on my baking sheet I use cornmeal, it give it much better texture. It’s delicious! The varieties of pizza are endless. I’ve included some pictures of pizzas I have made using this dough in the past. I’ll post about that at a later time. I hope this will at least give you a great start to make your own homemade pizzas with your loved ones now and later!
In a stand mixer, combine flour, sugar, salt yeast on low until blended. While mixer is running, add the water and 2 Tbsp olive oil, mixing until dough form into a ball (if too sticky, add a little more flour, 1 Tbsp at a time). Dough should come together in uniform but just slightly tacky to the touch. Turn out onto floured surface and knead slightly until smooth, firm ball is formed.
2
Grease large bowl with the remaining olive oil, add the dough, cover with plastic wrap and let sit in warm area until it doubles in size, about 1 hour. Turn the dough out onto flour surface, divide into 2 equal pieces. If cooking now, cover each with a clean kitchen towel and let rest 10 min.
3
If you want to freeze, go ahead and brush the ball with a little olive oil and wrap in plastic wrap. Place in freezer for 15 min (called “flash freezing”). Then place dough into plastic bag in freezer until ready to use.
Notes
You can use All Purpose flour, by all means. I like Bread Flour because it has a higher gluten content, which yields a much crispier crust. The AP flour will be a more chewier crust. Either flour is just fine!
Bucatini Amatriciana is another dish we have been wanting to try. This is yet another classic Italian dish that is simple yet very scrumptious! Because we are in rural America, we had to online order the Guanciale (One of the Italian versions of a bacon), but so very worth the extra cost. This little crispy bite was COMPLETELY addictive! Wow! It was unique in flavor, salty and I couldn’t stop going back for more! (I almost ate it all before the dish was complete). I have to tell you, this dish makes me want to NEVER use that jarred sauce again. It really was simple and tasty! I can see why Italians call this one of their four basic, classic dishes. YUM! The good thing about learning this recipe nowadays is that most ingredients CAN be ordered online if needed! Hope you all try this very delicious dish!
Placed chopped Guanciale in cold pot, add olive oil and warm up gradually. Render the fat, remove from pan when browned and crispy; set aside. Leave rendered fat in pot.
2
To the fat, add the chopped onion and cook until softened and translucent, 5-7 minutes.
3
Add garlic to onions and stir constantly for 1 minutes, until garlic is fragrant.
4
Add cans of tomatoes, stir. Bring to boil, then reduce to simmer, cover and cook for 45 minutes.
5
While waiting for sauce to finish cooking, (can do this immediately or time it to when sauce is finished), cook pasta in salted boiling water (salty like sea water) until al dente (about 2 minutes before box recommendation). Save 1 cup of water before draining pasta. Leave pasta in strainer, add 1-2 Tbsp of olive oil to keep from sticking, but DO NOT RINSE PASTA (ever! Unless you're making pasta salad)
6
After 45 minutes of cooking, mash tomatoes with potato masher until broken up, then add salt and pepper to taste.
7
Add red pepper flakes to sauce, along with salt and pepper to taste (ALWAYS TASTE BEFORE ADDING!)
8
Add cooked pasta, cheese and 1/4 cup pasta water to sauce, stirring for several minutes, until well absorbed. (Can add more pasta water, 1/4 cup at a time, as needed to make it saucy).
9
Transfer to serving bowl, garnish with more shredded Pecorino-Romano, chopped parsley, Guanciale bits and a little drizzle of olive oil. Enjoy!
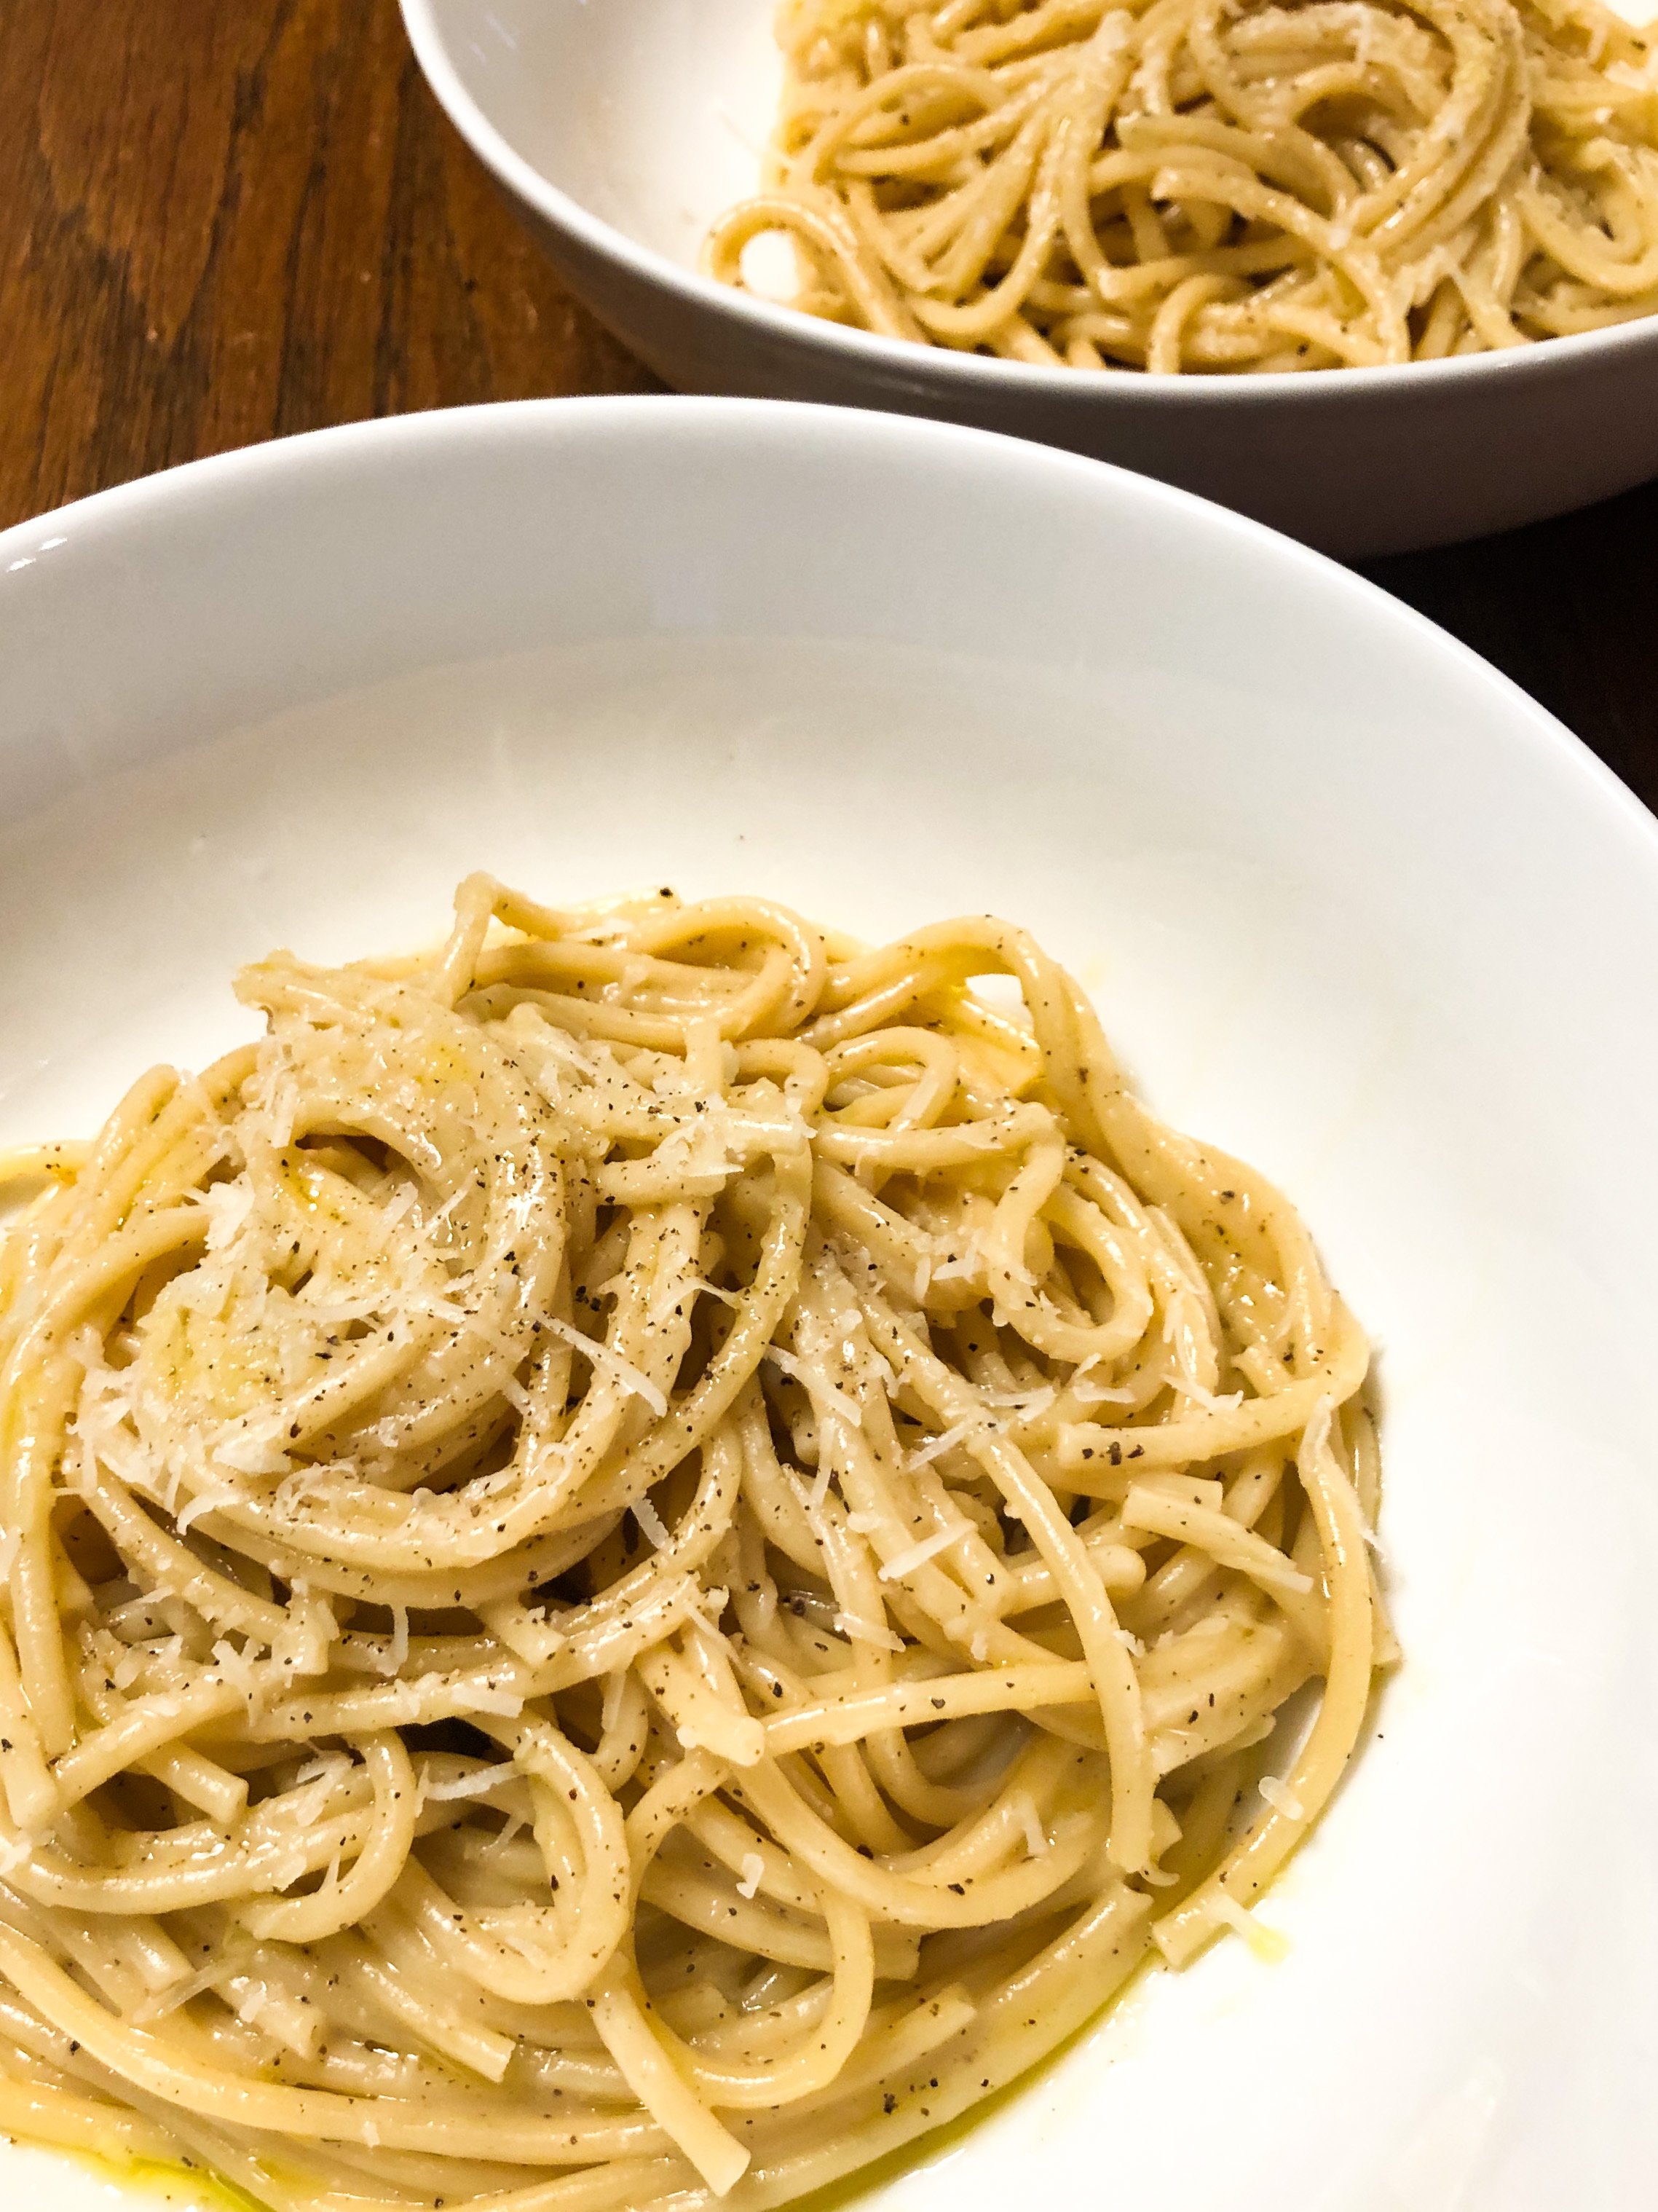
“Cacio e Pepe” literally means “Cheese and Pepper”. That’s pretty much it. It only has FOUR ingredients! (plus the water and salt, of course). We’ve been talking about making this recipe for awhile now. It is apparently one of THE four classic pasta dishes from which all pasta dishes start. It is so simple yet so delicious, I don’t know why we waited so long! (Oh wait, I remember it is because we have to drive an HOUR away to find some Pecorino Romano….but OH MY! I’m in love with this cheese! Totally worth it!!). I’ve also just recently discovered Bucatini noodles (thick cut, spaghetti-type noodle but with a hole in the center to soak up any sauce even better!). This noodle has a really great bite and I’ve used it in a few other recipes recently, which I loved. This recipe usually calls for a thick-cut spaghetti but I still wanted to try it with the Bucatini, so I did! I have to say it was very scrumptious, although I’m afraid the sauce soaked up a little too well. So, if you’re a saucy kinda person, in which case just use a quality spaghetti noodle (I included alternative directions to create more sauce, should you prefer that way instead). Personally, I don’t mind the less-saucy finish, it’s all bout the flavor and bite of the noodle to me anyway. But DO be sure to buy the correct cheese and use freshly ground pepper. You’ll be so glad you did. I hope y’all enjoy it as much as we did! Bon Appétit!
1/2 cup freshly grated Pecorino Romano cheese, plus more for serving
2 Tbsp Extra Virgin Olive Oil, plus more for serving
(Salt for water and to taste at end)
Instructions
1
Using a shallow pan (wide enough for noodles and deep enough to hold about 1 inch water), bring to a boil. Add 1-2 Tbsp of salt, so that it tastes like broth (don't over salt, you can add some at the end as needed). Add noodles to the boiling water, spreading them out the get them all in the water. Stir several times throughout cooking to prevent noodles from sticking to each other.
2
While the noodles cook, heat a small shallow pan over low heat and add pepper, toasting it for about 2 minutes to help release the oils, hence releasing more flavor. Grate the cheese and have ready to go.
3
When all the pasta water is just about evaporated (bottom of pan should still be coated with the starchy water) and noodles are al dente, remove from heat. Add the olive oil, toasted pepper and half of the cheese to the noodles. Using tongs or 2 large forks, toss vigorously to coat evenly. Add the rest of the cheese and continue to toss until all incorporated and cheese has melted into the noodles. Taste and add salt to taste, if needed.
4
Transfer to serving bowls and sprinkle with more cheese and finish with a little drizzle of the olive oil, then enjoy!
Notes
For a creamier sauce, cook the pasta is in a large pot of salty water (in this case, you will want to salt the water to taste like sea water). While noodles cook, toast the pepper and place it along with olive oil in a large bowl. When noodles are al dente, DO NOT DRAIN WATER (you will need it to add it to the pasta as desired). Instead, use tongs to transfer the noodles directly from the pot into the bowl with pepper and oil, then toss to coat the noodles. Add the cheese and toss vigorously until cheese melts into noodles. Add some of the pasta water, 1/4 cup at a time, to the noodles to create a more creamy sauce. Then serve with the finishing touches the same as above. Enjoy!
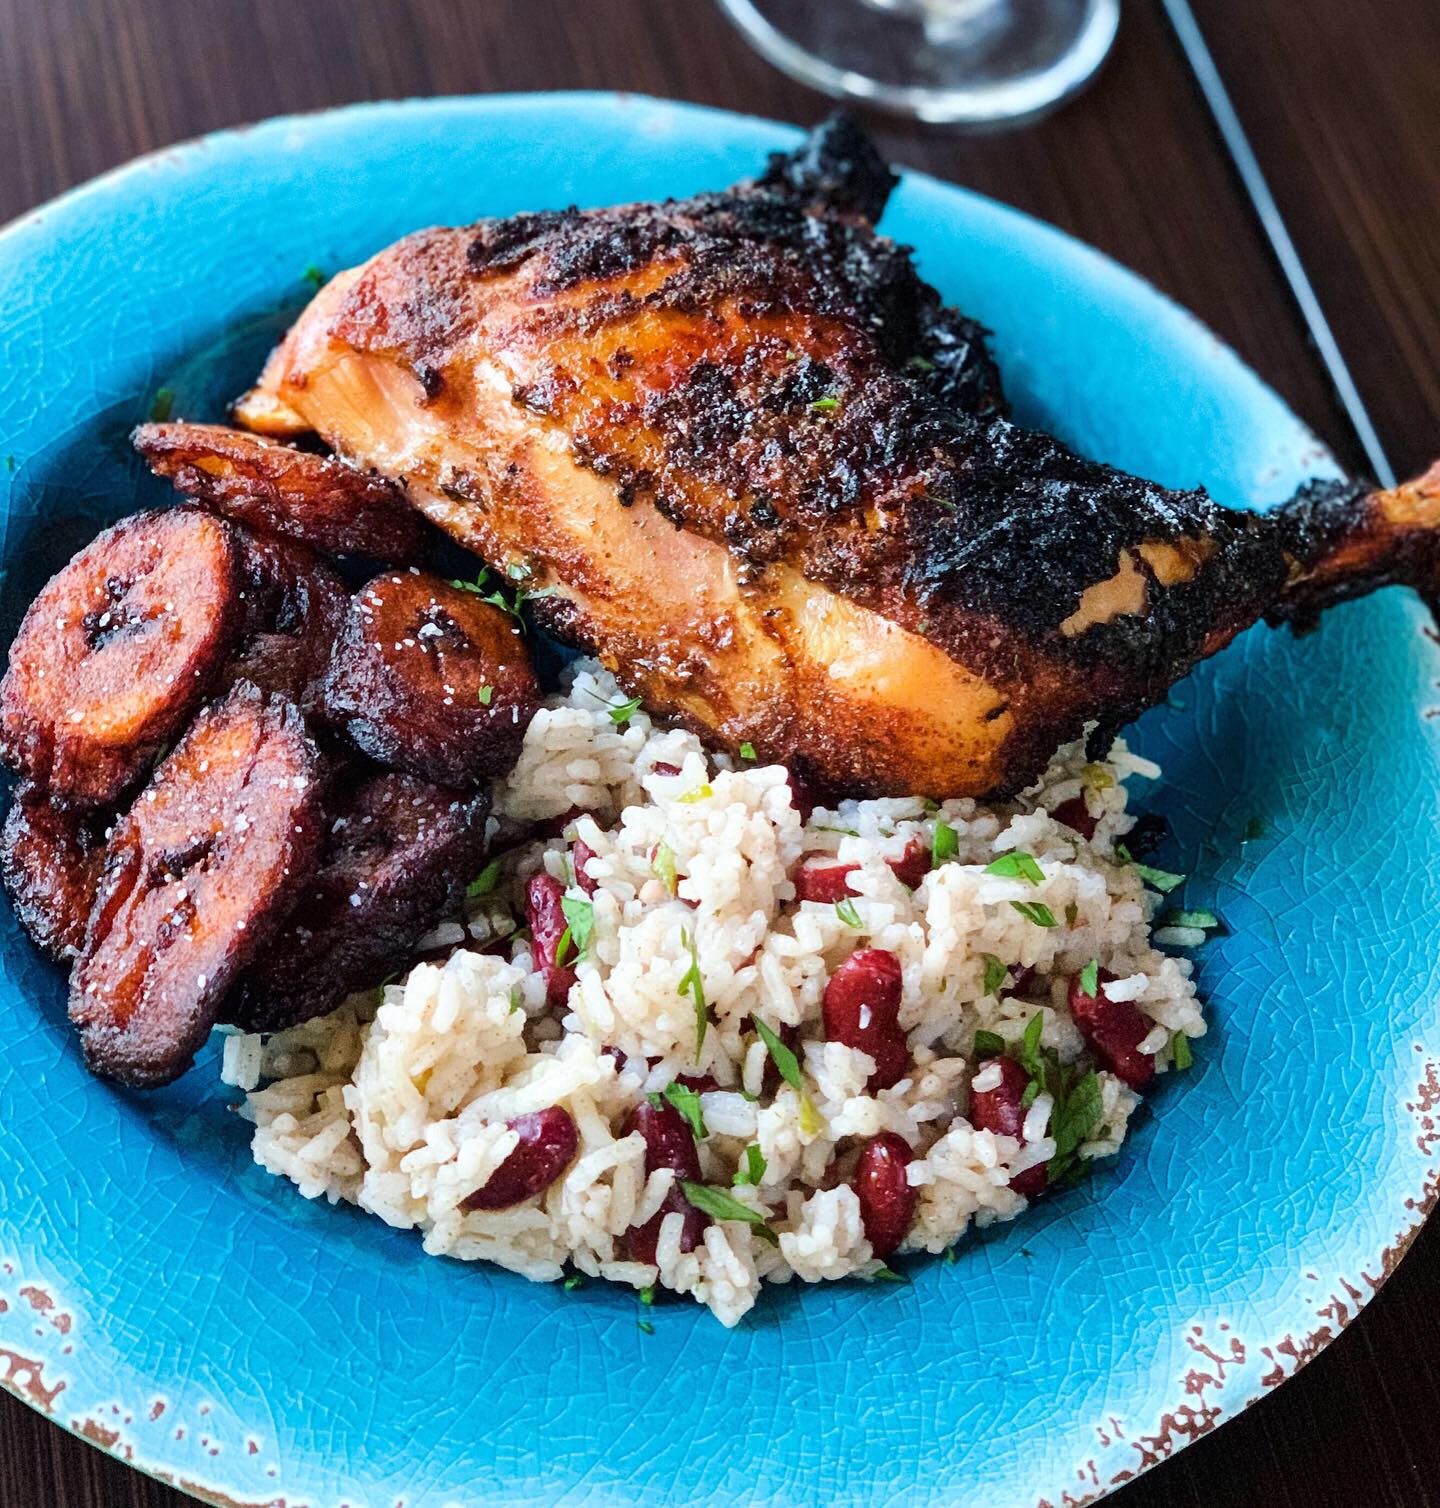
We were ready to do something different this weekend, something that we have yet to try. Of course, we also wanted to use the grill or smoker (do be outdoors and enjoy the last days of summer), so chicken quarters were an obvious choice for us! I love the flavors of the Caribbean, so we decided to bring the taste of Jamaica to our own backyard. I can still remember (and still crave!) those amazing flavors from a trip with my mother years ago. It was the first time I tried Jamaican Jerk Chicken, down at Montego Bay, during one of our stops on a cruise we took years ago along the Caribbean Coasts. This is the best recipe I have found that brings me back to those tropical memories! I’ve added a few of my own twists to it, but this is as close as I have ever been to it again! (Maybe one day soon Jeff and I will get to experience it first hand!) Until then…
The first step to any great tasting chicken is to BRINE THAT BIRD!! No matters the flavors you are going to add before grilling, baking, pan frying or deep frying, BRINING the chicken for 8-24hrs (ideal is 24 hrs) is the BEST way to keep that chicken moist and flavorful. I use pretty much the same brine (see recipe below), regardless of the flavors we are doing later. Be sure to take the chicken out of the brine, rinse, pat dry and let sit at room temperature for about an hour before cooking. Then go ahead with your seasoning, being sure to use your hands to really massage and rub the flavors in well, then grill it up!
The Jamaican Rice and Beans (called “peas” in Jamaica) are a great side dish to add plenty of low-fat, high nutrition along with helping to balance out the heat from the spicy chicken. The fried plantains add a nice, sweet, crunchy yet custardy texture to the complete whole meal. Be sure to choose plantains that are almost all black and give a little to slight pressure. These are the ripest and less starchy, so they fry up well. They don’t need any other seasoning other than a pinch of salt when coming out of the fryer.
Small handful of fresh Italian (flat-leaf) parsley
2 lemons, sliced
For the Jerk Seasoning:
1 Tbsp garlic powder
3 tsp cayenne pepper
2 tsp onion powder
2 tsp dried thyme leaves
2 tsp dried parsley
2 tsp sugar
2 tsp salt
1 tsp paprika
1 tsp ground allspice
1/2 tsp freshly ground pepper
1/2 tsp crushed red pepper flakes
1/2 tsp ground nutmeg (or 1/8 tsp freshly grated)
1/4 tsp cinnamon
For Jamaican Rice:
1 cup Jasmine rice
1 can (13.5 or 14 oz) coconut milk
1/2 cup water
1/2 sweet (Vidalia) onion, diced
1 Serrano pepper, halved, seeded and sliced
1/2 tsp ground allspice
1/2 tsp salt
Pinch of freshly ground black pepper
3 sprigs of fresh thyme
1 clove garlic, peeled and smashed
1 can (15 oz) dark kidney beans, drained and rinsed
2 Tbsp fresh Italian parsley, chopped
For the fried plantains:
3 very ripe plantains, peeled and cut on the diagonal
1 1/2-2 cups vegetable oil
Pinch of kosher salt
Instructions
1
For the brine, combine all ingredients except salt and fresh herbs and bring to a boil over med-high heat. Add salt and stir until dissolved. Take off heat, add herbs and allow to cool completely. Add leg quarters to the brine, keep in fridge for at least 8 hrs and up to 24 hrs, for best results. About an hour before cook time, remove from brine, rinse, pat dry and allow to come up to room temp.
2
To make the rice: In a large pot add everything but the rice and beans, heat over medium heat to bring to a boil. Add the rice and stir, reduce heat to simmer then cover and cook for 20 minutes, until the rice is tender and liquid is absorbed. (I stir mine twice during that cooking time to ensure rice doesn’t stick to bottom of pan, and watch the liquid, may need to have a few tablespoons of warm water if getting too dry before rice is cooked through). When rice is finished, turn off the heat and add the beans. Stir and cover another 10 minutes to heat the beans through. Fluff with fork and sprinkle with chopped parsley before serving.
3
In the meantime, combine all the Jerk Seasoning into small bowl, stir well and set aside. Heat grill to medium-high heat. Add seasoning to all sides of the chicken then pat and massage into the chicken and let set for 10 minutes. Place chicken on hot grill, skin side down, until outside is carmelized and crust has formed, about 7 minutes. Turn chicken over, reduce to medium or move to indirect heat and cook another 15-20 minutes, until internal temperature reaches about 170 degrees (temp will rise about 10 more degrees while resting; 180 degrees is the target temp). Set chicken aside and cover with foil loosely, allowing to rest for 10 minutes.
4
For the plantains, add oil to shallow dish and heat on medium-high until oil is very hot (should see ripples, but can take a slice of plantain and hold end into oil, if oil is bubbly around it then it is ready, if not, allow to heat longer). Add plantain slices to hot oil in batches (be sure not to crowd the pan), turning every 5-7 minutes, until deep golden brown. Remove to cooling wrack (on top of baking sheet to catch the oil), adding pinch of salt while still hot. Allow to cool slightly before serving.
1 Jalapeño, seeded and diced (or keep the seeds if you like extra spicy!)
1/4 Cup Cilantro, roughly chopped
4-5 Dashes Mexican Hot Sauce (I use CHOLULA - can find at Walmart!)
Salt & Pepper to taste
Instructions
1
For avocados, slice in half (run knife lengthwise along seed), slightly twist and pull apart halves. Remove the seed (can use tip of a spoon to gently run underneath it to lift it out, OR, if daring enough and want to look pro, you can use sharp knife to quickly whack it-not sure of the professional term there, then pull up and twist it out). Place avocado halves in large bowl.
2
Squeeze the lime juice over all the avocado, then using a masher or fork, mash to desired consistency.
3
Add the onions, cilantro, jalapeño and hot sauce, mix well to blend.
4
Add salt and pepper to taste (avocados need a lot of salt, but you cant remove once in, so add a few pinches at a time, taste and add more if needed)
5
Enjoy immediately or store for several hours in fridge to develop even more flavor (be sure to use plastic wrap directly on top of the guacamole when storing to prevent browning).
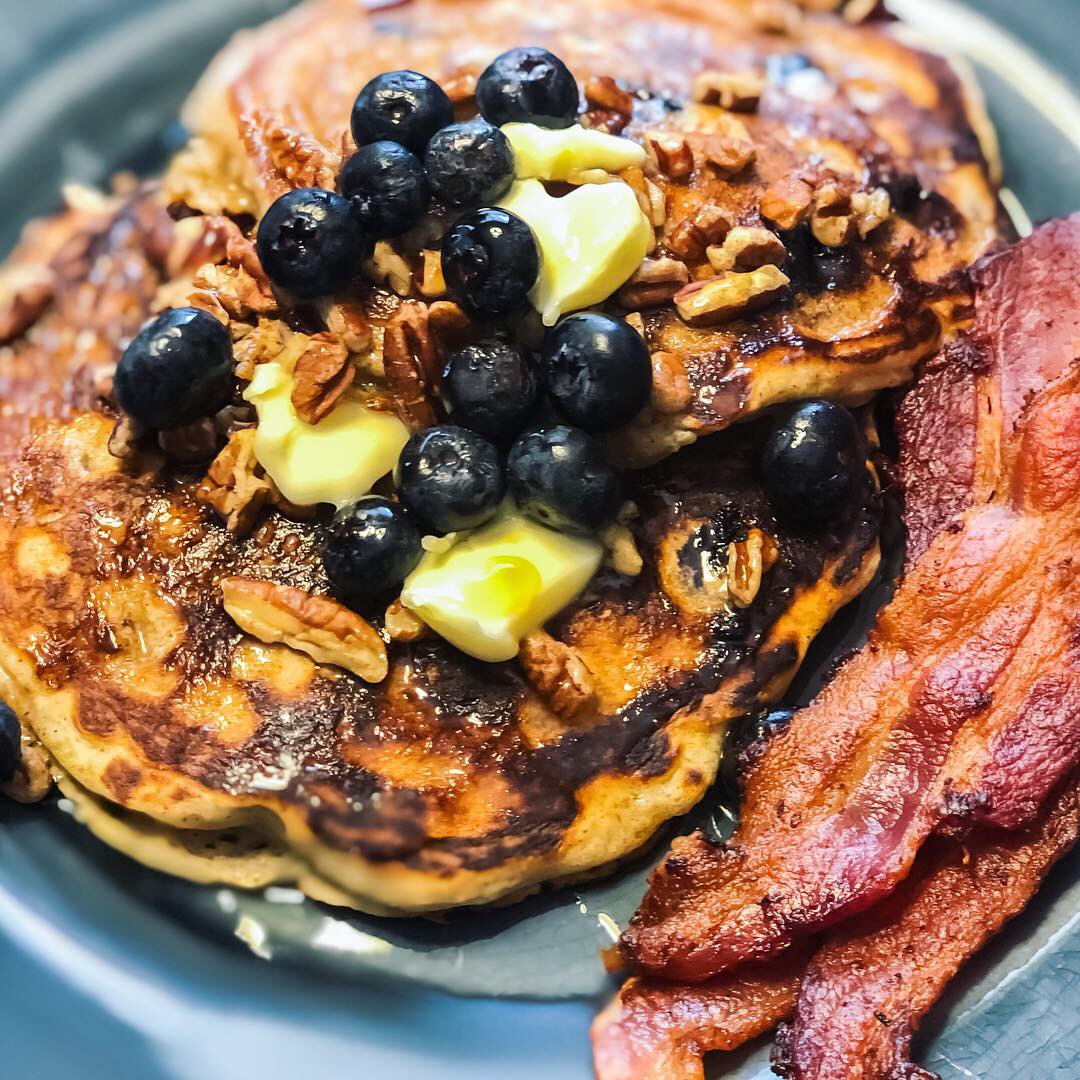
These Blueberry Pecan Pancakes are the BEST pancakes I have ever had. We first had these at a cooking class we attended while in Houston last year (called The Urban Chef). We had an awesome chef that day teaching us how to make these along with some other great brunch food. We had a blast and, of course, loved eating all the delicious food our class made. We’ve made these pancakes several times since then and I personally crave these pretty often. I even brought some to work one time for my fellow nurses and they loved them too (even the guy who doesn’t like pancakes loved them!!). Toasting the pecans before using them makes a huge difference in the overall taste, so it’s worth the extra step. We also try to make our own blueberry compote (syrup) when we can and ladle it over them (recipe below). You can just add more blueberries and pecans on top drizzled with whatever syrup you like (as pictured above). You will see that we like to add the blueberries and toasted pecans on top of the pancake when poured onto the griddle, but you can also mix it in the batter before cooking, if you prefer. You can use fresh, dried or frozen blueberries for this. Hope you enjoy!!
Blueberry Pecan Pancakes with Homemade Blueberry Compote
1/2 cup real maple syrup (can also use honey), and add more or less to your taste
1 tsp lemon zest
1 tsp lemon juice
Instructions
1
Toast the pecans by heating in a shallow pan over med-low heat for 3-5 min until you can smell their nutty aroma. (Be careful not to burn them, shaking the pan often to keep them moving some). Set aside.
2
To make the blueberry compote: add the blueberries to small saucepan along with the maple syrup, lemon zest and juice. Bring to a boil then simmer on low for 8-10 minutes. Set aside and keep warm.
3
For the pancakes: Start with the dry mix by combining in a large bowl both flours, brown sugar, baking powder, cinnamon and salt. Whisk together.
4
For the wet, combine the eggs, egg whites, buttermilk and oil. Whisk until combine.
5
Dump the wet mixture into the dry mixture and mix with whisk just until combined (don’t over mix!)
6
Heat griddle to 325 degrees and add about 1 Tbsp of canola oil (it’s hot enough when a drop of water sizzles)
7
Use 1/4 cup measure to poor pancakes onto hot griddle. Place as many blueberries and pecans on top as desired.
8
When edges appear dry and are golden brown on the bottom, carefully flip each pancake. When the center of the pancake is soft and spongy to the touch, they’re ready! (Only turn them once! Over flipping them will make them tough).
Notes
If you prefer to add the blueberries and pecans into the batter, add them to the dry mix and stir to combine before adding the wet (this will keep the berries from sinking). Not everyone in this house likes the blueberries and/or nuts, so we add to them as we make them. (You can also add chocolate chips instead of berries! That would be delicious as well!)
This Pasta Carbonara is probably one of my FAVORITE comfort foods IN THE WORLD! It is so easy and quick to make, I cannot believe it took me so many years to discover it!! There are many varieties of this dish out there, but this one (to me) is the best. This is a great dinner to quickly whip up on any busy family weeknight, or a great romantic dinner you and your loved one can enjoy making and tasting together. Many of my friends think we keep a fancy and expensive pantry to keep up with some of these dishes we put out there. I do admit, we sometimes have to travel a little farther, or order online, to get some of the ingredients we need for our recipes. However, THIS recipe’s ingredients can be found just about anywhere, in any small town (like ours!). In fact, I made this last night even though we were short a few of our usual ingredients (here I used pics from last night’s results, along with another time when I did have all the ingredients). So last night we were able to substitute the Parmesan cheese with Cojita cheese (a crumbly, mexican version of parmesan that is just as salty and yummy!), then just left off the parsley (since we didn’t have any inside, or outside, the house right now). This dish usually calls for pancetta, but we cannot get that around here, or likely any smalltown, USA, lol. So, we just use good old fashion BACON. How can anyone not like BACON?!?! I mean, c’mon….it’s PASTA and BACON! Together! What more shall I say?? Other than it never disappoints the palate nor the tummy! Enjoy!
1 Lb. dried spaghetti (we use whole wheat pasta to make ourselves feel better about it, it's all about balance, right?)
2 Tbsp olive oil
4 Ounces bacon, sliced into strips or cubed
4 Garlic cloves, peeled and chopped
1 tsp red pepper flakes (or more if you like it spicy like us!)
2 Large eggs, whisked
1 Cup freshly grated Parmesan-Reggiano (or just Parmesan freshly grated, or pre-grated, if that's all you can find)
Freshly ground pepper
Handful of fresh flat-leaf (Italian) parsley, chopped
Instructions
1
Timing is important with this dish, so cook the sauce while the pasta boils. The pasta must be hot so the raw eggs will cook when mixed in at the end.
2
Add the dry pasta to pot of boiling water that has been salted generously (I do 1-2 palm fulls of kosher salt) and cook according to package directions.
3
Heat large pan over medium heat, add olive oil and bacon. Cook until bacon is crispy and the fat is rendered.
4
Meanwhile, whisk the eggs and cheese together in a bowl; set aside for later.
5
When the bacon is done, add the garlic and red pepper flakes, then stir continuously 2-3 minutes (keep it moving so you don't burn the garlic!)
6
Using tongs, transfer the cooked pasta directly from the pot into the large pan and toss the pasta well with tongs to coat the strands with the bacon fat. (you can also drain the pasta, but be sure it stays hot and reserve 1-2 cups of the pasta water to use later)
7
Take the pan off the heat (so as not to make scrambled eggs!) then add the egg/cheese mixture, quickly tossing it all together until the sauce has coated the pasta.
8
Thin the sauce by adding pasta water, 1/4 cup at a time, until desired consistency (I usually end up adding 1 - 1 1/2 cups, but I like it creamy!)
9
Season with freshly ground pepper and salt to taste.
10
Sprinkle the top with parsley and more grated cheese, if desired.
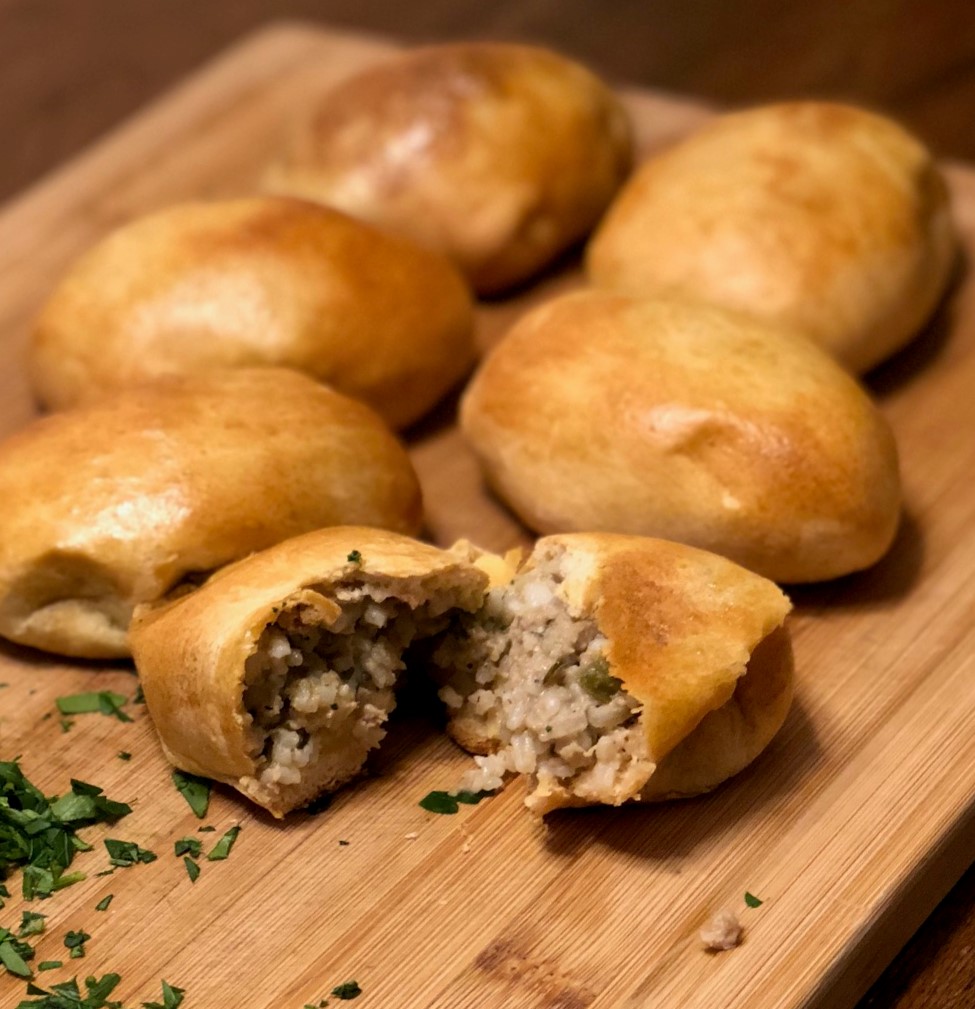
These Boudain (that’s the Cajun version of boudin!) rolls are a HUGE hit at our house. These hearty rolls of scrumptiousness are very easy to make for breakfast, snack or whenever! They usually don’t last very long around here. The times I have made some for a work potluck, they are pretty much gone in 60 seconds. We prefer them spicy, but if you prefer it mild, just go with plain boudain. Here in the south, we call these Kolaches (although the correct name for this is Klobasnek – pastry with savory meat inside, we find it much easier to say ko-lach’-ees!) Plus, this was their name when we first discovered them around here in a local donut shop. Now we found a way to make them at home anytime we crave them. Hope you enjoy as much as we do!
1 pkg (12 oz) Zummo's Jalapeno Boudain (this is our favorite, but any boudin will work)
1 pkg (8 oz) Crescent Dough Sheet
1 Lg egg
1 Tbsp water
1 Tbsp dried parsley (optional)
Instructions
1
Preheat oven to 375 degrees and line baking sheet with parchment paper.
2
Cook the Boudain according to package directions. (We cook our links in shallow pan with 1" water until internal temp is 160 degrees--casing may burst and it is OK!)
3
Transfer the Boudain to a bowl and remove casings. Set aside to cool, about 10-15 min.
4
Roll out crescent dough sheet and cut into 6 even squares (or can make smaller squares if you want them more bite-sized)
5
With spoon or ice cream scoop, place Boudain mix onto squares, then fold corners towards the middle and gently pinch together until seams are closed and roll is formed.
6
Place seam-side down onto parchment-lined baking sheet.
7
Whisk egg and water together and brush on top and sides of rolls. Sprinkle with parsely (if using)
8
Bake 13-15 min, or until golden brown.
9
Transfer to serving platter and enjoy!
Notes
You can use crescent roll dough as well. With the pre-cut dough, you can mold each triangle around the boudin for snack-size option, or press the pre-cut seams together and make your own cuts!